

Your MacBook Can Organize Its Own Mess
Using shortcuts to name files, read receipts, and organize your work in the background

Your MacBook knows what’s in your screenshots. It just isn’t doing anything about it.
Right now your screenshots land in a folder full of timestamps that mean nothing, so when you need one you’re opening file after file trying to guess what’s inside.
I stopped letting my screenshots pile up and gave my MacBook the job of handling them.
Now every screenshot gets analyzed, renamed, and turned into something I can actually find later.
If your screenshots folder looks like a timeline of timestamps, your computer isn’t doing its job. Here’s how to fix it.
Giving Your MacBook the Job
The Shortcuts app lets you assign your computer tasks and decide when it runs them. You decide the job and when it runs, and your Mac handles it from there.
To name screenshots, your computer needs to understand what’s in the image.
Apple Intelligence handles this on most newer Macs. If yours doesn’t, you can run the same workflow locally with a model through a Run Shell Script action using a tool like Ollama.
What You Need
A Mac with the Shortcuts app
Apple Intelligence enabled
A dedicated screenshots folder
Set this up with command + shift + 5 then select options.
The Screenshot Naming shortcut (below)
Automatically Naming Screenshots
Here’s how to build the screenshot naming shortcut:
Set the Shortcut Input
Open the Shortcuts app and create a new one.
Start with an action to Get Images from Input. Click the input and select “Shortcut Input”

Tell the shortcut where the screenshots come from. At the top of the shortcut, set the Shortcut Input to receive images.
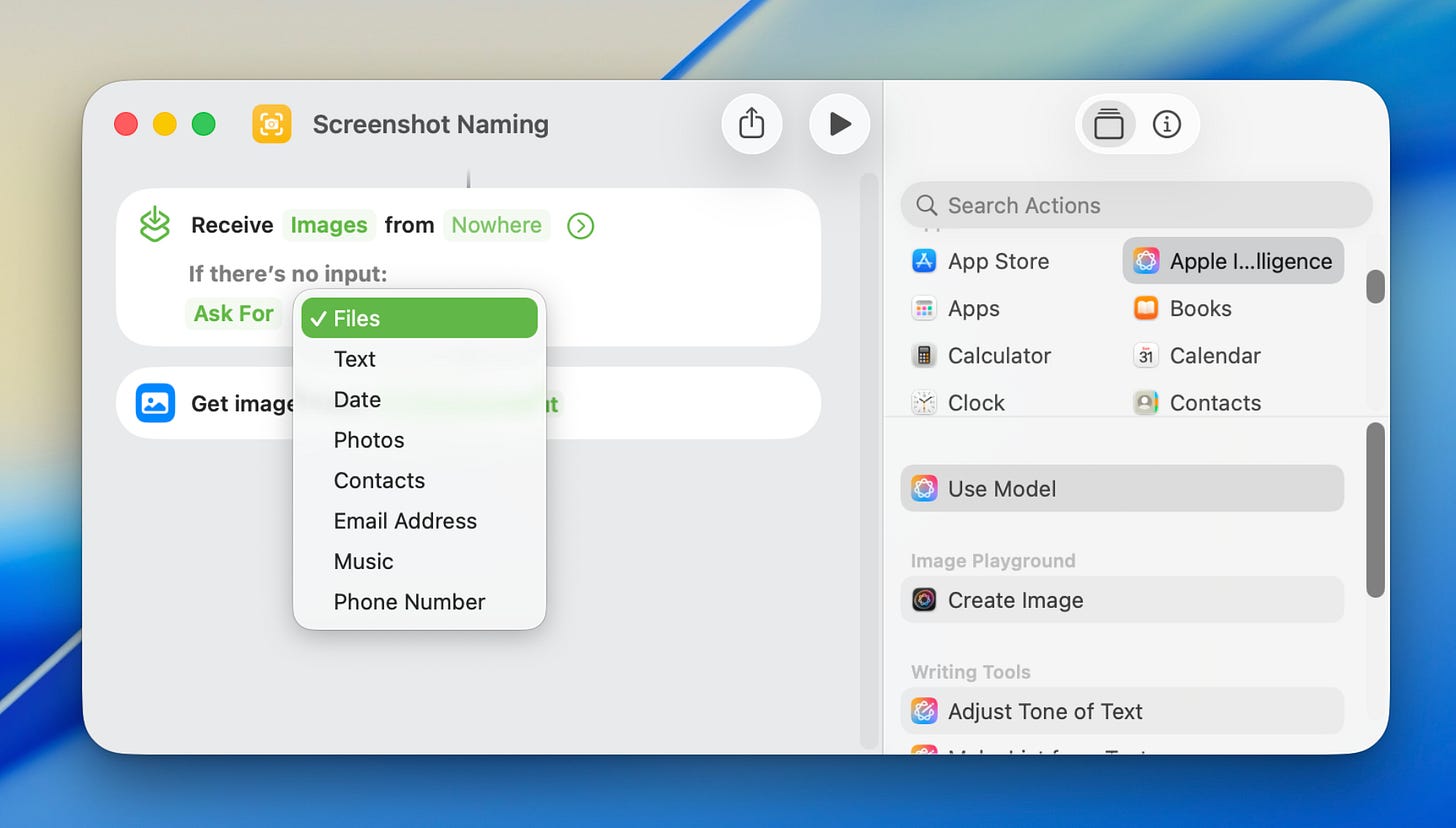
Set it to accept images and handle manual runs. Under If there’s no input select ask for files. So you can run the shortcut manually.


Configure Apple Intelligence
Next, have Apple Intelligence analyze what’s inside those images with the action Use Model.
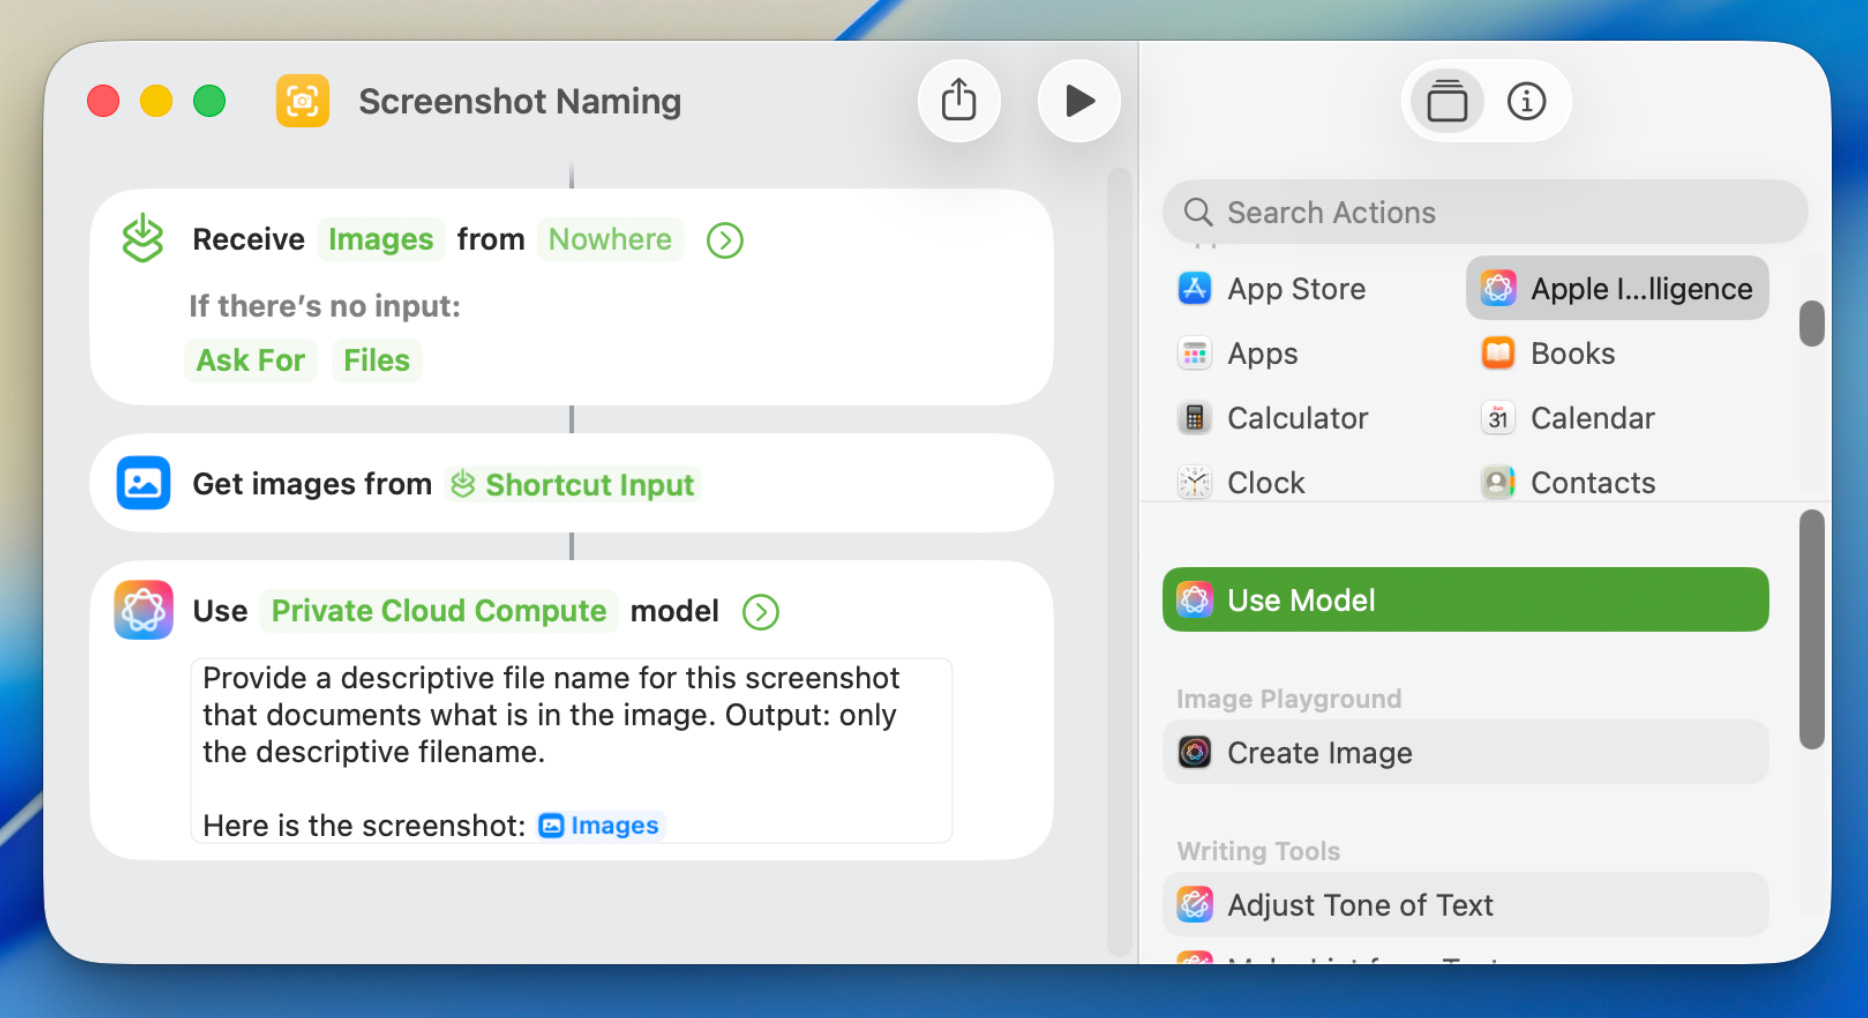
You’ll see a dropdown where you can choose which model to use. For now, select Private Cloud Compute. This will give you enough power to analyze a screenshot and generate a filename.
In the text box under the model dropdown, write your prompt. Give it a prompt like this:
Provide a descriptive file name for this screenshot that documents what is in the image.
Output only the descriptive filename.

Here is the screenshot: [images from previous action]
Rename the Image
Finally, Rename File passes the response to your screenshot.

Right-click the File field and select the Shortcut Input. Then set the type to File.
In the To field, right-click and select Insert Variable, select Response.
The Response is what Apple Intelligence generated from your prompt and will be the name of your screenshot.
Run it once and adjust the prompt until the filenames are actually useful.
Want to skip the build?
Download the finished shortcut here:
Make It Run Automatically
Now you have a Shortcut to make your computer name screenshots. Next, make it handle the new ones automatically.
Open the Automation tab in the Shortcuts sidebar and create a new automation.
Select Folder as the trigger.
Choose your screenshots folder.
If you haven’t set up one yet, just hit command + shift + 5 and select options so your screenshots all save to one place.
Set it to run when any item Is Added.
Select Run Immediately so your computer handles it without asking.
Choose the screenshot naming shortcut you just built.

Now whenever you take a screenshot, your MacBook automatically grabs it, analyzes it with Apple Intelligence, and renames it to something you can actually find later.

A week later, you search for what you saved instead of opening twelve screenshots trying to guess which one it was.
A Few Things To Know
This shortcut is built to handle files one at a time. If you drop a batch of old screenshots into the folder at the same time to be named, the shortcut can error out or stop partway through.
File names won’t be overwritten. If Apple Intelligence suggests a name that’s already sitting in that folder, the rename fails and the file keeps its default timestamp name. So if you spot a screenshot that didn’t get renamed or get an error running the screenshot, that’s usually why.
Keep Your Screenshots Private
When you use Apple Intelligence inside Shortcuts, you’re choosing where your data gets processed. That choice decides where the work happens and whether your data leaves your device.

Private Cloud Compute
Private Cloud Compute handles more complex requests using Apple’s secure servers.
You get better AI features while your data stays inside Apple’s encrypted system instead of going to third-party apps.
On-Device
The on-device model runs directly on your iPhone or MacBook, and everything stays on the device itself. It’s meant for simple text-based requests and doesn’t work directly with files.
So if you want to use it with a receipt, screenshot, or photo in Shortcuts, add an action to extract the text from your image or file first, then send that text to the model.
The on-device model also runs without Wi-Fi or service, which makes your automations a lot more reliable.
ChatGPT
ChatGPT is useful when the workflow requires stronger reasoning, more context, or longer outputs.
The tradeoff is that you’re now using an external model, so your request leaves your device to get processed. You just need to know when something stays on your device versus when it leaves it.
Choosing What The Model Sends Back

The output dropdown matches the response to whatever your next action needs:
Automatic lets Apple Intelligence pick the format. Fine for simple jobs like naming a file.
Text returns a written response. Use it for a filename, note, or summary.
Number returns a value you can count or do math on.
Date drops straight into a calendar event or reminder.
Boolean returns true or false, so your shortcut can branch on a yes-or-no decision.
List returns multiple items your shortcut can loop through one at a time.
Dictionary returns labeled data, so you can pull out specific pieces later, like the vendor, total, and date from a receipt.
Running Shortcuts With Local AI
If your Mac doesn’t support Apple Intelligence, or you want the whole workflow running through a local model, you can use Ollama instead.
Ollama lets your Mac run AI models locally. In Shortcuts, use the Run Shell Script action. The shortcut passes the selected image into a shell script, Ollama reads the image with a vision-capable model, and the response comes back into Shortcuts so you can use it for the next action.
The local version looks like this:
Select Photos or receive an image from Shortcut Input
Run Shell Script with the image passed in as an argument
Ask Ollama to describe the image or generate a filename
Use the response in Rename File, Create Note, or another action

This turns Shortcuts into a front door for local AI. Your Mac handles the file, the model runs on your machine, and the output goes right back into the automation.
Your Turn
You just gave your MacBook a job it should’ve had already.
Instead of letting screenshots pile up as timestamped mystery files, you built a system that watches the folder, reads the image, names the file, and keeps moving in the background.
That’s the difference between owning a computer and giving it responsibilities.
Pick one messy folder and give it a job this week. Then stop managing everything yourself.
Start with the free screenshot naming shortcut, run it once, and watch your computer clean up after itself.
This is the kind of system we build inside AI Flow Club. Turning everyday digital clutter into something your tools actually manage.
I am getting a "Frame Load Interrupted" error when this is set to run automatically. It works when I trigger it manually. Any ideas on a fix?