

Build an AI Prompt Library on Your iPhone
How to Use Shortcuts to Make Your iPhone Write and Save AI Prompts

Your best AI prompts are probably lost in chat history.
You wrote something useful weeks ago. It worked. And now it’s buried under conversations you’ll never scroll back through.
This shortcut fixes that.
This shortcut collects your goal, constraints, and desired output, then generates a structured prompt and saves it to a searchable library in your Notes app. No more rewriting from scratch or scrolling to find your prompts.
Let’s build it.
Here’s What This Does
This shortcut turns vague ideas into reusable AI prompts.
When you run it, your phone asks three questions:
What’s your goal?
What are your constraints?
What output format do you want?
Then it generates a complete prompt using Apple Intelligence or ChatGPT, formats it with markdown, and saves it to a Notes folder with a clear title and purpose statement.
The result: a searchable prompt library organized by task type. No scrolling. No rewriting. Just pull up the prompt and use it again.
The Four-Phase System
Phase 1: Information Collection
Your iPhone asks for your goal (summarize a meeting, write a marketing email, create a plan), your constraints (word count, tone, audience, exclusions), and your output format (bullet points, paragraph, step-by-step list).
Phase 2: Prompt Generation
Apple Intelligence combines your inputs into a structured prompt using the “Use a Model” action. The prompt tells the AI to generate a title, purpose, and full prompt based on your criteria.
Phase 3: Output Formatting
The shortcut requests a dictionary output instead of free text. This ensures consistent fields every time: title, purpose, and prompt. Then it extracts each field, formats them with markdown (bold purpose statement, code block for the prompt), and converts to rich text.
Phase 4: Storage in Notes
The formatted prompt gets saved to your designated Notes folder. The note title matches the generated title. The body includes the purpose and the full prompt in a copyable format.
How to Build It
Step 1: Create Your Prompt Library Folder
Open Notes. Create a new folder called “Prompt Library” or whatever makes sense for you. This is where every generated prompt will live.
Step 2: Set Up Information Collection
Open Shortcuts. Tap the plus sign. Add three “Ask for Input” actions.
First action: “What is your goal?”
This is the task you’re trying to accomplish. Be specific. “Summarize a meeting transcript” is better than “summarize something.”
Second action: “What are your constraints?”
This limits variation. Examples: “Use a professional tone, limit to 150 words, no emojis” or “Write for a non-technical audience, avoid jargon, include examples.”
Third action: “What output format do you want?”
This controls structure. Examples: “Bullet points under Decisions and Action Items” or “A single paragraph with no more than three sentences.”
Step 3: Generate the Prompt
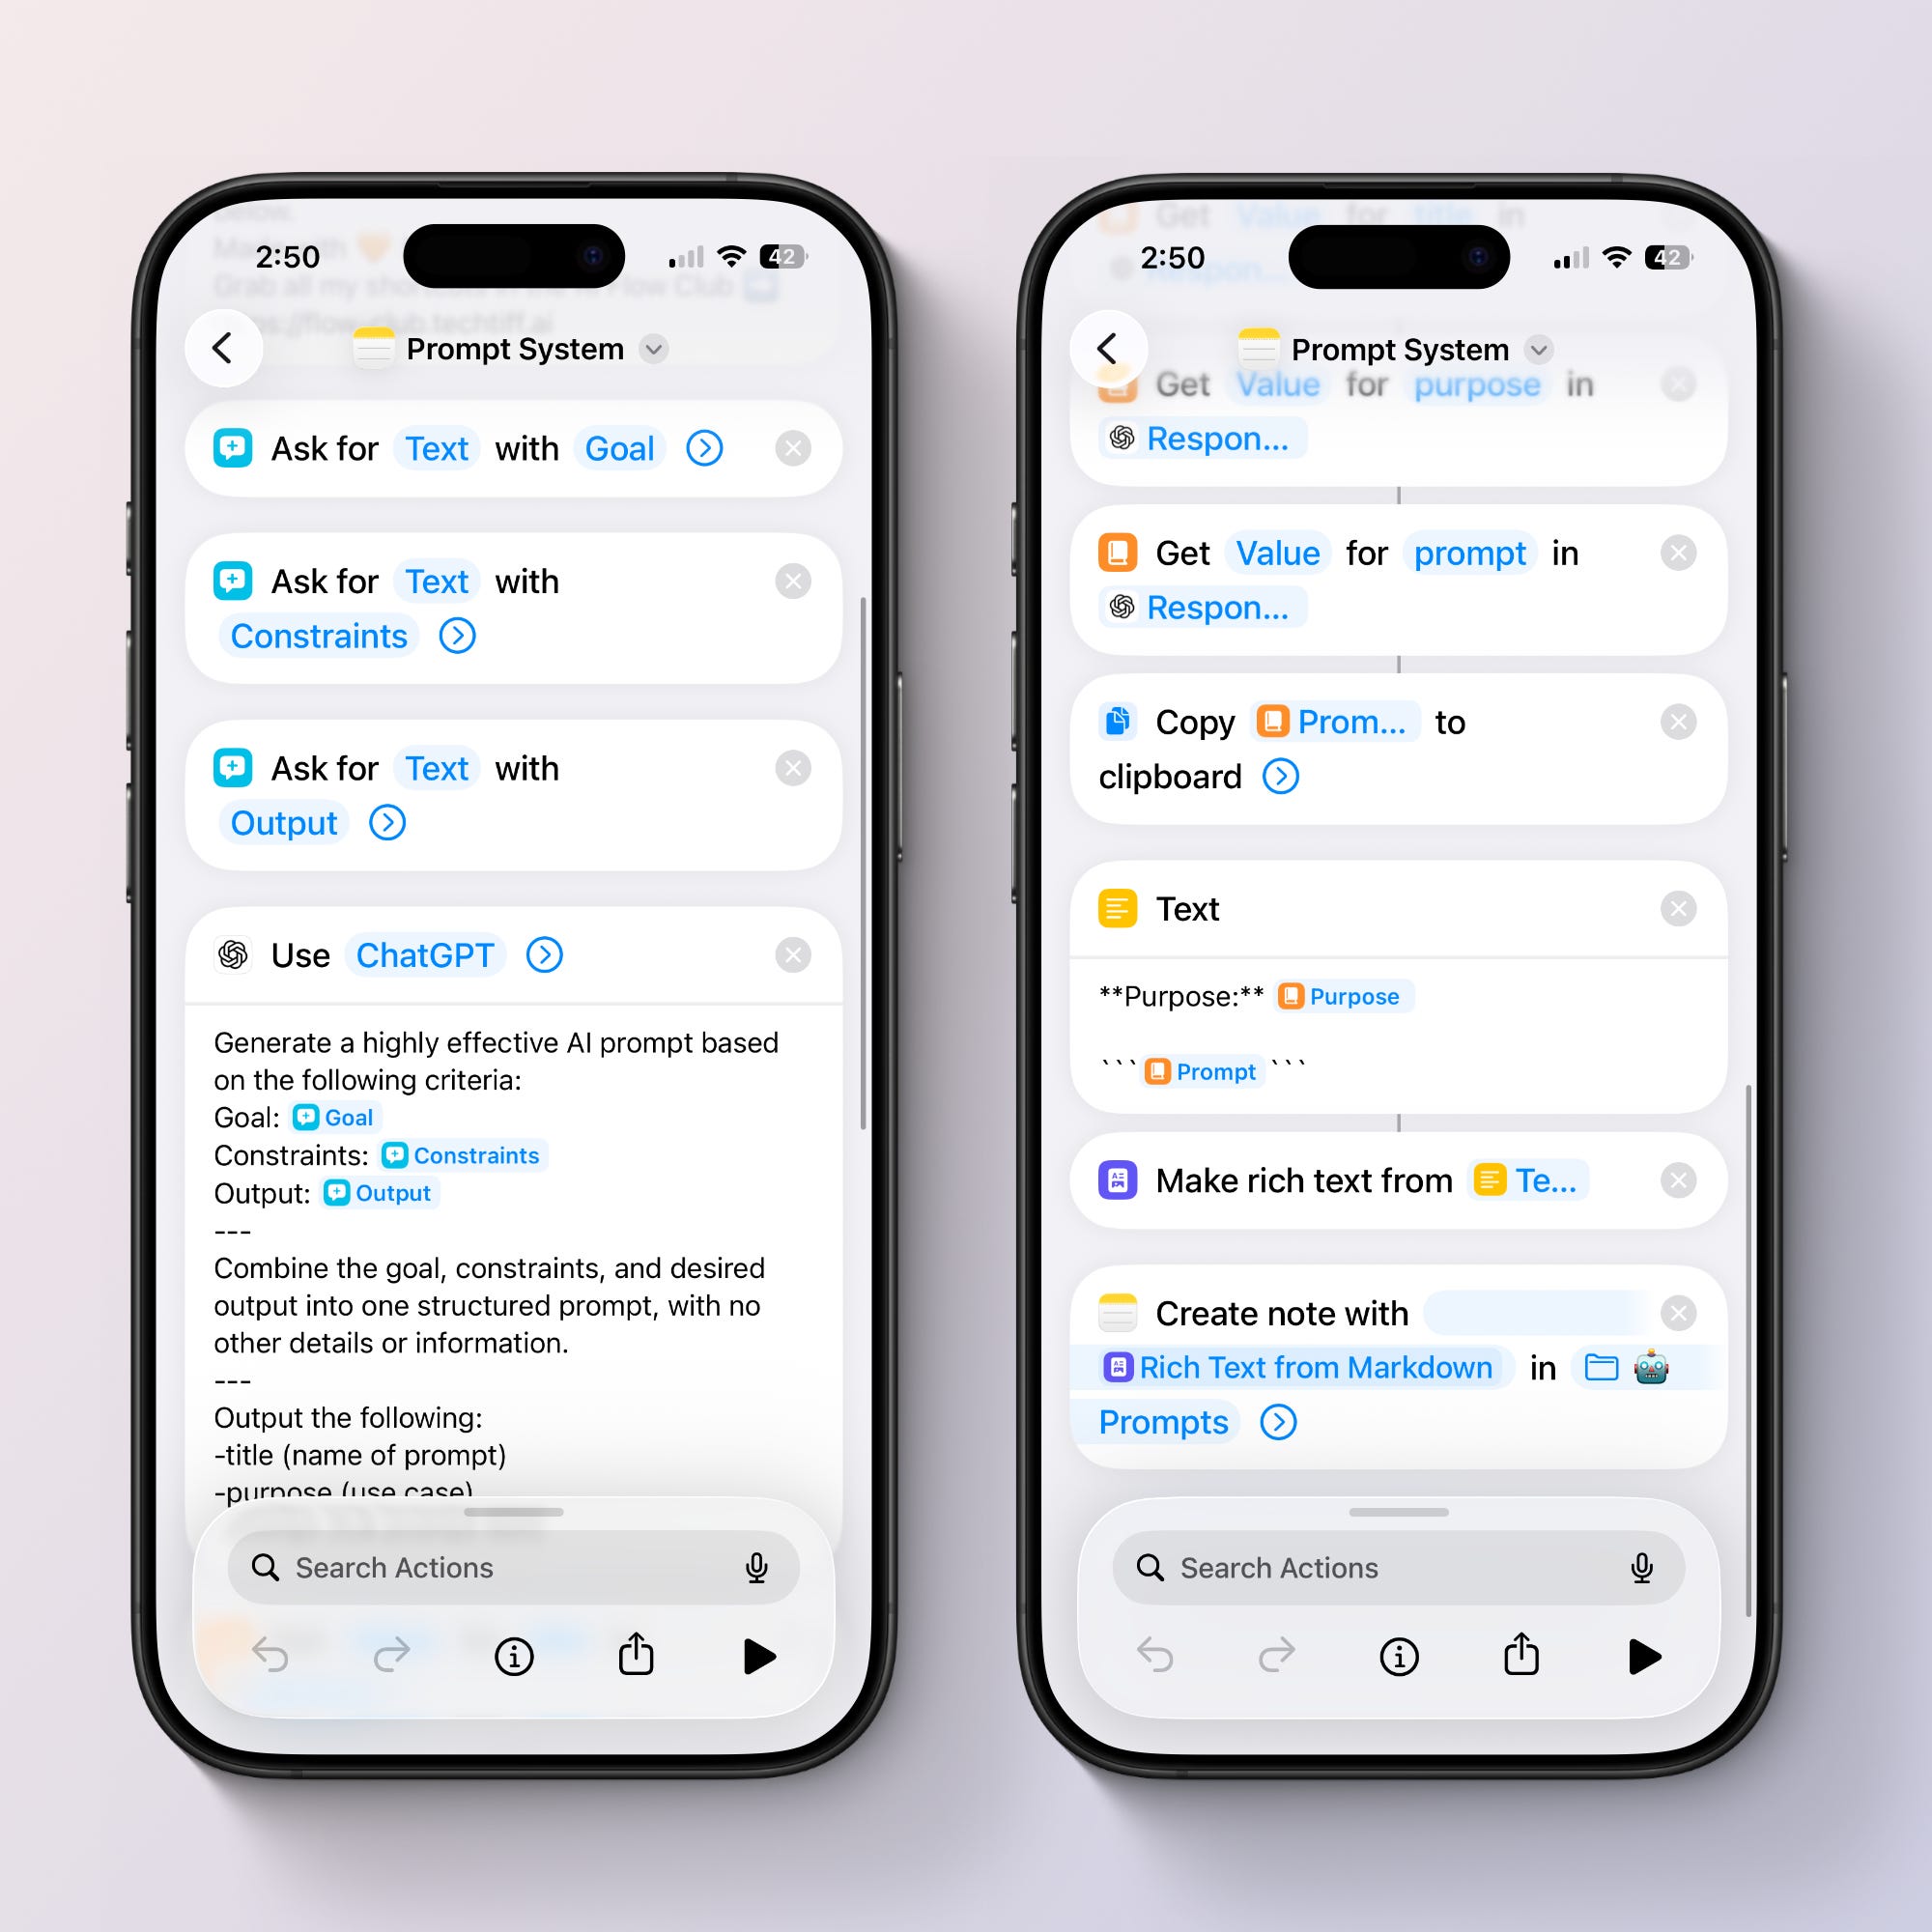
Add the “Use Model” action under Apple Intelligence. Select ChatGPT as your model.
Write this prompt exactly:
Generate a highly effective AI prompt based on the following criteria.

Goal: [select the Goal variable]
Constraints: [select the Constraints variable]
Output: [select the Output variable]

Combine the goal, constraints, and desired output into a structured prompt.

Output the following:
- title
- purpose
- prompt
Tap “Select Variable” after each field. Choose the correct “Ask for Input” action. Rename each variable by tapping on it: Goal, Constraints, Output. This keeps your workflow readable.
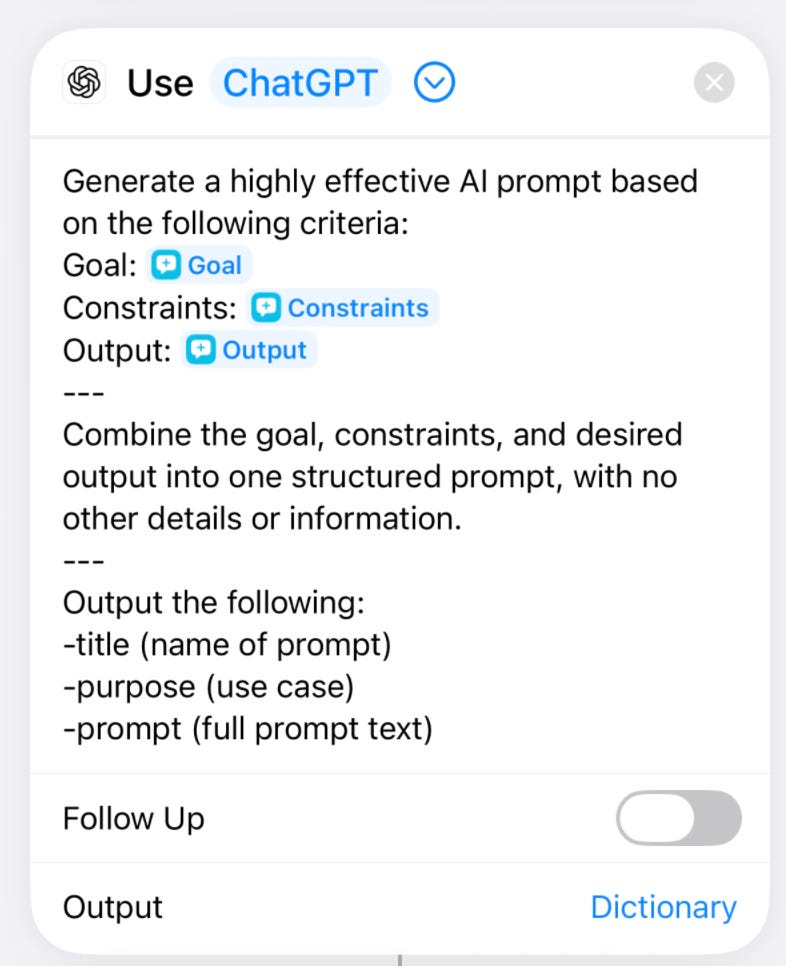
Toggle down on the action and set the output type to “Dictionary.” This forces structured fields instead of conversational responses.
Step 4: Extract and Format the Data
Add three “Get Dictionary Value” actions. Set each key to match what you requested: title, purpose, prompt. Use lowercase to match the system prompt exactly.
Add a “Text” action. Format it like this:
**Purpose:** [purpose variable]

```[prompt variable]```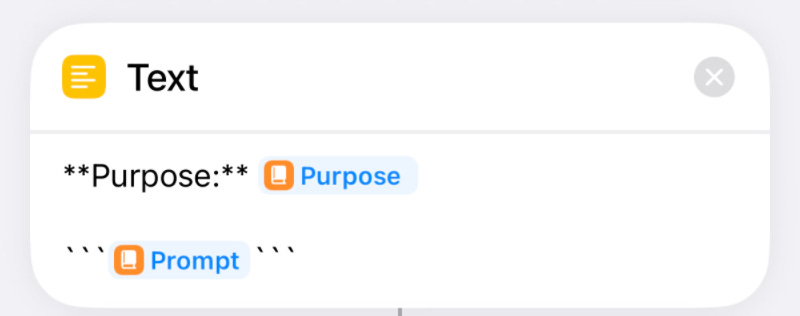
The asterisks make the purpose bold. The backticks (long-press the apostrophe key, select the leftmost option) create a code block for easy copying.
Add “Make Rich Text from Markdown.” This converts your formatting into readable Notes content.
Step 5: Save to Notes
Add “Create Note.” Select your Prompt Library folder. Use the title variable for the note name. Use the rich text output for the body.
Done. Your shortcut is complete.
Ask ChatGPT vs Apple Intelligence
If you aren’t using Apple Intelligence, the “Ask ChatGPT” action can be used instead.
But there’s a key difference: structured output.
Apple Intelligence’s “Use Model” action supports a dictionary output. This means you can request specific fields (title, purpose, prompt) and extract them individually with precision.
The standard "Ask ChatGPT" action returns one block of text. Everything - title, purpose, prompt - comes back as conversational text. When you copy it to the note, it pastes as plain paragraphs. No bold purpose. No code block. No markdown formatting.
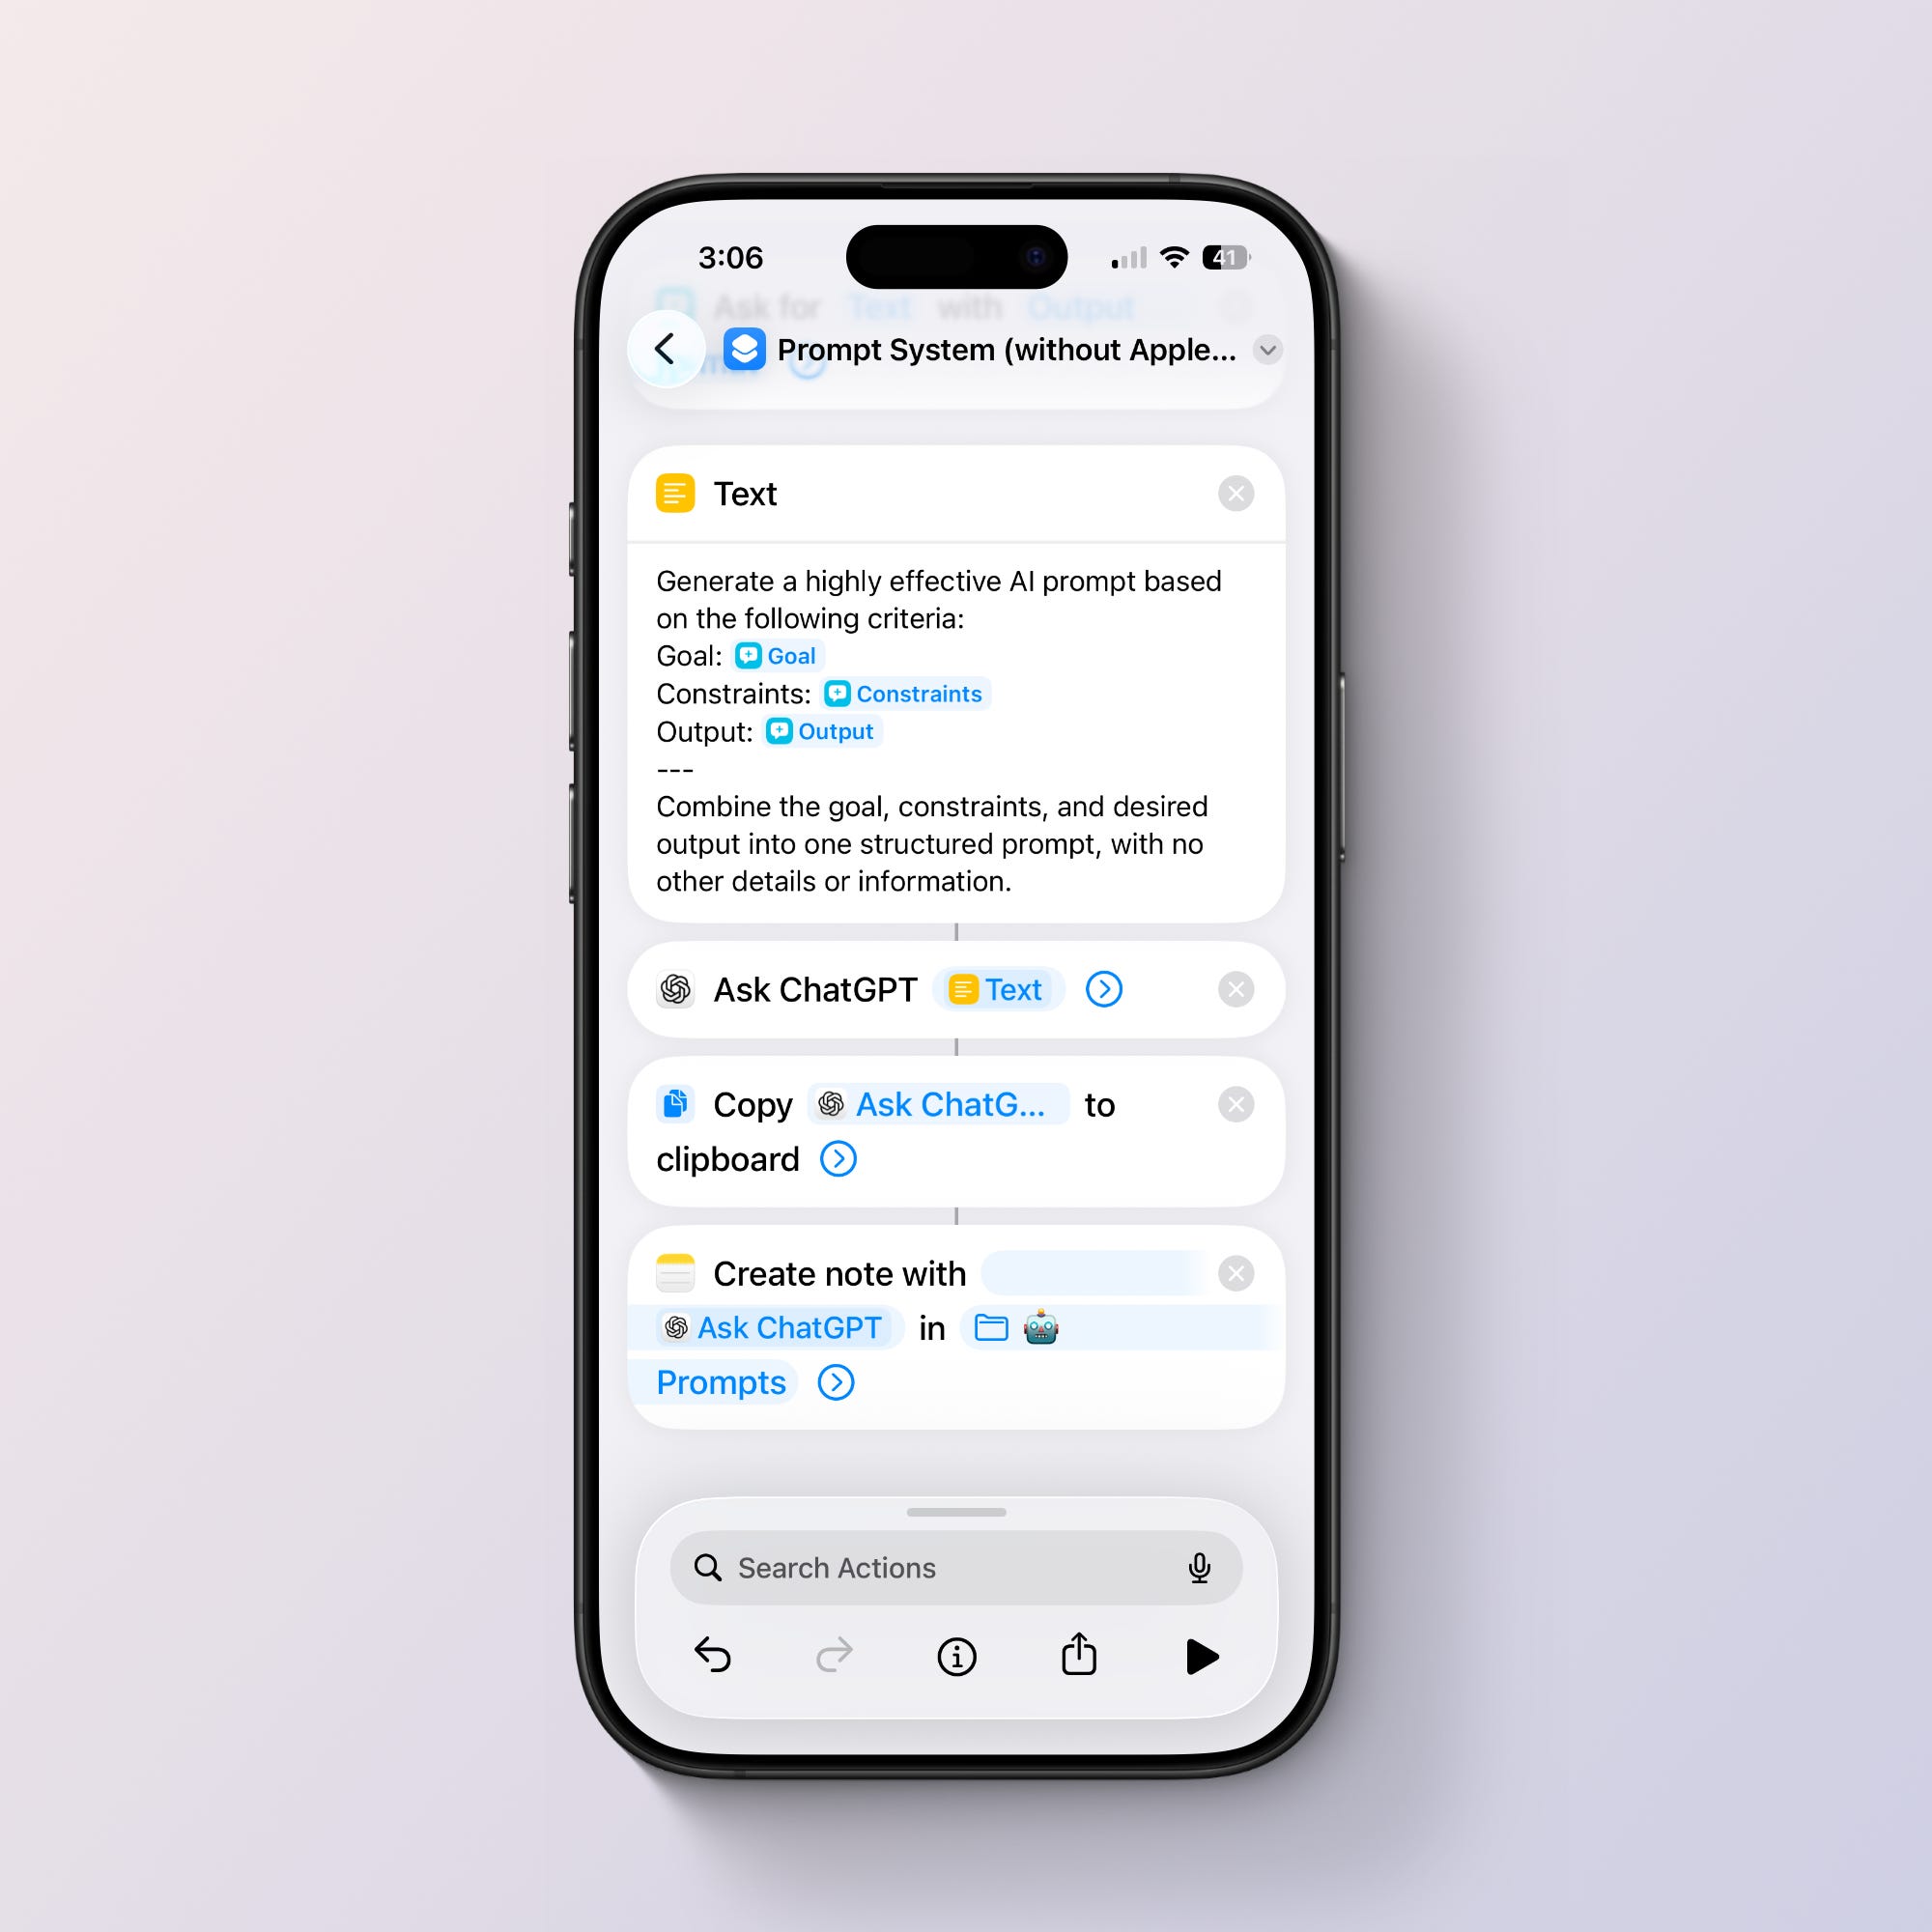
Use Ask ChatGPT if: You don’t have Apple Intelligence enabled or prefer a simpler setup.
Testing the Shortcut
I dropped in a goal to get my meeting transcripts summarized.
Goal: “Summarize a meeting transcript”
Constraints: “Be concise, focus on decisions and action items, ignore small talk”
Output: “Bullet points under Decisions and Action Items”

The result: A note titled “Meeting Summary Generator” with a purpose statement and a structured prompt ready to copy into ChatGPT.
Enhancements You Can Add
Subfolder Organization
Create subfolders in Notes for different prompt categories: Writing, Planning, Summarizing, Marketing. Add an “Ask for Input” action with a list of folder options. Set the “Create Note” folder dynamically based on the user’s selection.
Why This Matters
Most people have great prompts buried in chat history. They know they wrote something effective weeks ago, but finding it means scrolling through dozens of conversations.
This system eliminates that. Every good prompt gets saved, titled, and stored in a searchable folder. When you need it again, you open Notes, find the prompt, and copy it. No rewriting. No scrolling. No memory required.
This is the difference between using AI occasionally and using it as part of your workflow. Once this is set up, your phone handles the repetitive part. You focus on the work the prompt supports.